App development is an iterative process that combines creativity, logic, and a healthy dose of repetitive code. What if an intelligent assistant could step in at every stage to simplify tasks, speed up creation, and improve the quality of our code? That’s the promise of Gemini, Google’s AI model, accessible directly from your terminal via the Gemini CLI.
For Flutter developers, this tool opens up exciting possibilities. Forget simple autocompletion; we’re talking about a true partner capable of understanding your project, generating complex widgets, debugging errors, and even writing your tests.
This article is a comprehensive practical guide. We’ll follow the lifecycle of a Flutter app, from blank page to final touches, and see how to integrate Gemini into your daily workflow in a concrete and effective way. Get ready to boost your productivity tenfold.

Part 1: Setup and Getting Started
Before you can delegate tasks to your AI assistant, you need to invite it into your workspace and teach it the house rules.
Prerequisites & Installation
First, ensure you have Node.js version 20 or higher installed.
You can then run the CLI directly or install it globally.
- Run directly (recommended for quick use):
npx https://github.com/google-gemini/gemini-cli- Or install globally:
npm install -g @google/gemini-cli
gemini
Authentication: Choose Your Path
You have two main ways to authenticate:
Set it as an environment variable in your terminal. Replace YOUR_API_KEY with your generated key.
- Sign in with your Google Account (Default): When you first run the CLI, you’ll be prompted to sign in with your personal Google account. This is the simplest method and grants you a generous free tier of up to 60 requests per minute and 1,000 requests per day.
- Use a Gemini API Key (More Control): For more control over the model you use and access to different rate limits, you can use an API key. This free tier provides 100 requests per day using Gemini 1.5 Pro.
- Generate a key from Google AI Studio.
- Set it as an environment variable in your terminal. Replace
YOUR_API_KEYwith your generated key.
export GEMINI_API_KEY="YOUR_API_KEY"You are now ready to use the Gemini CLI! For more information about installation, follow this link.
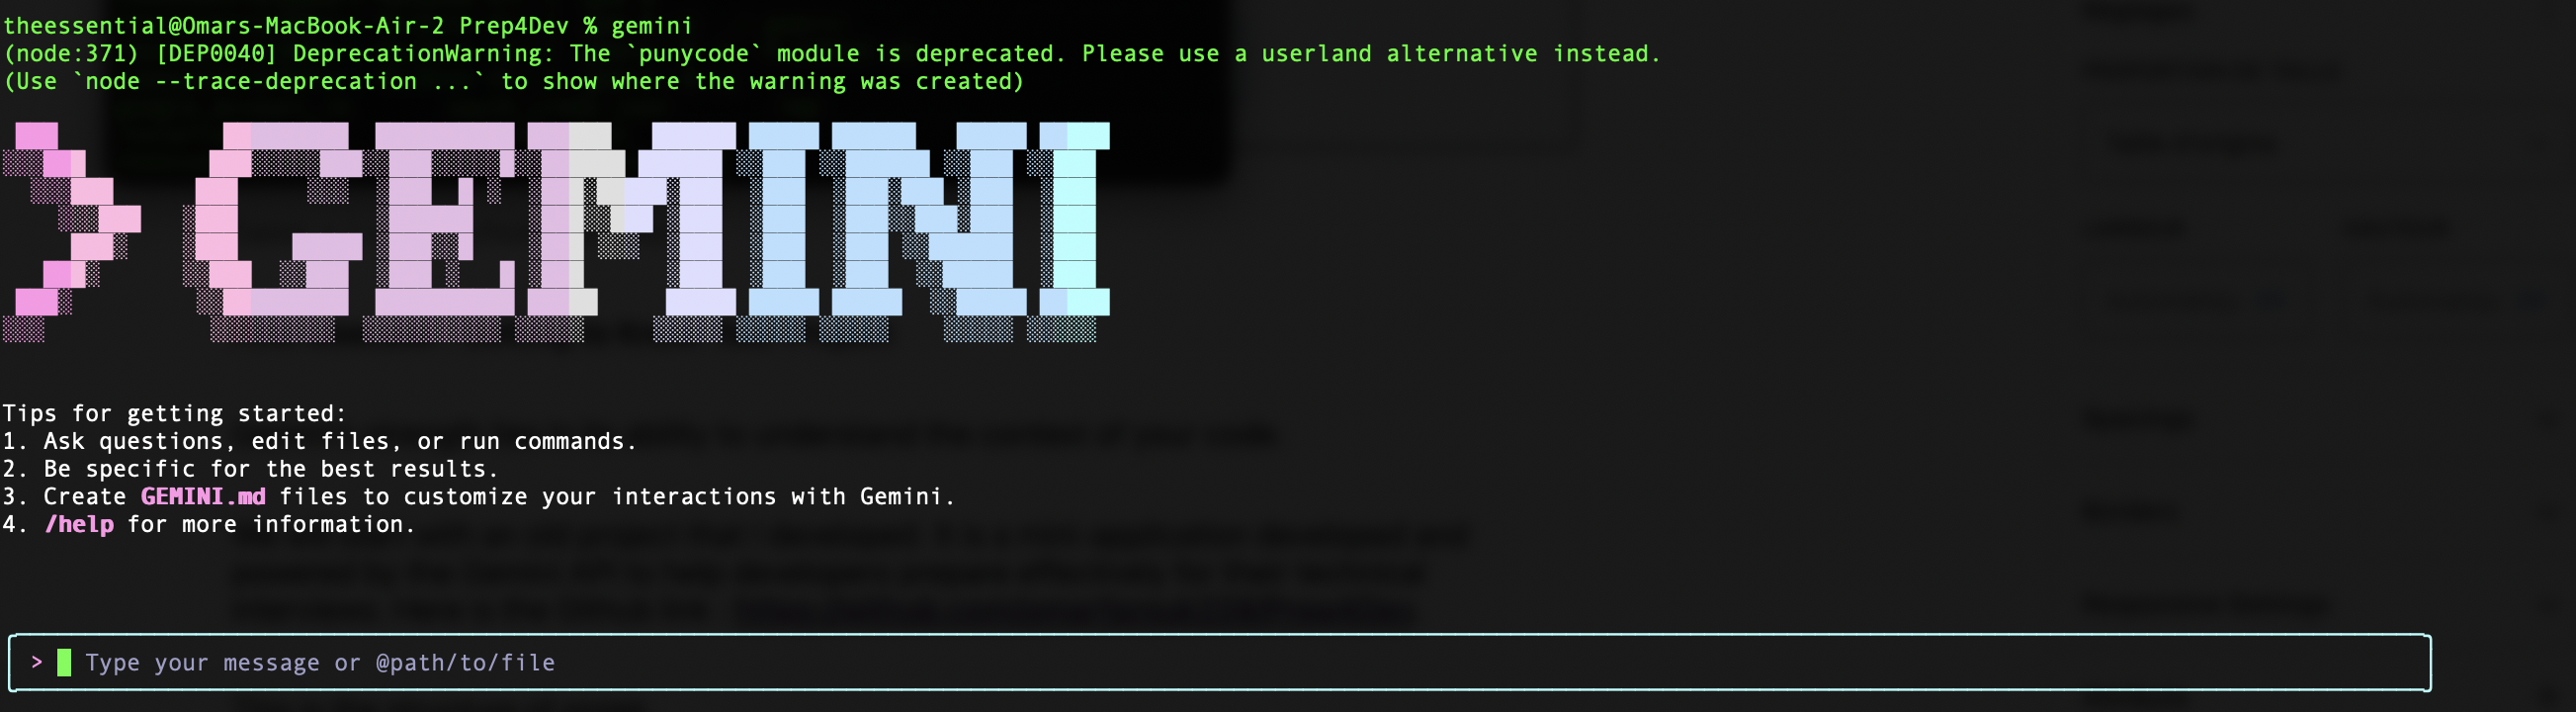
When you type the command “gemini” in the terminal, you get this:
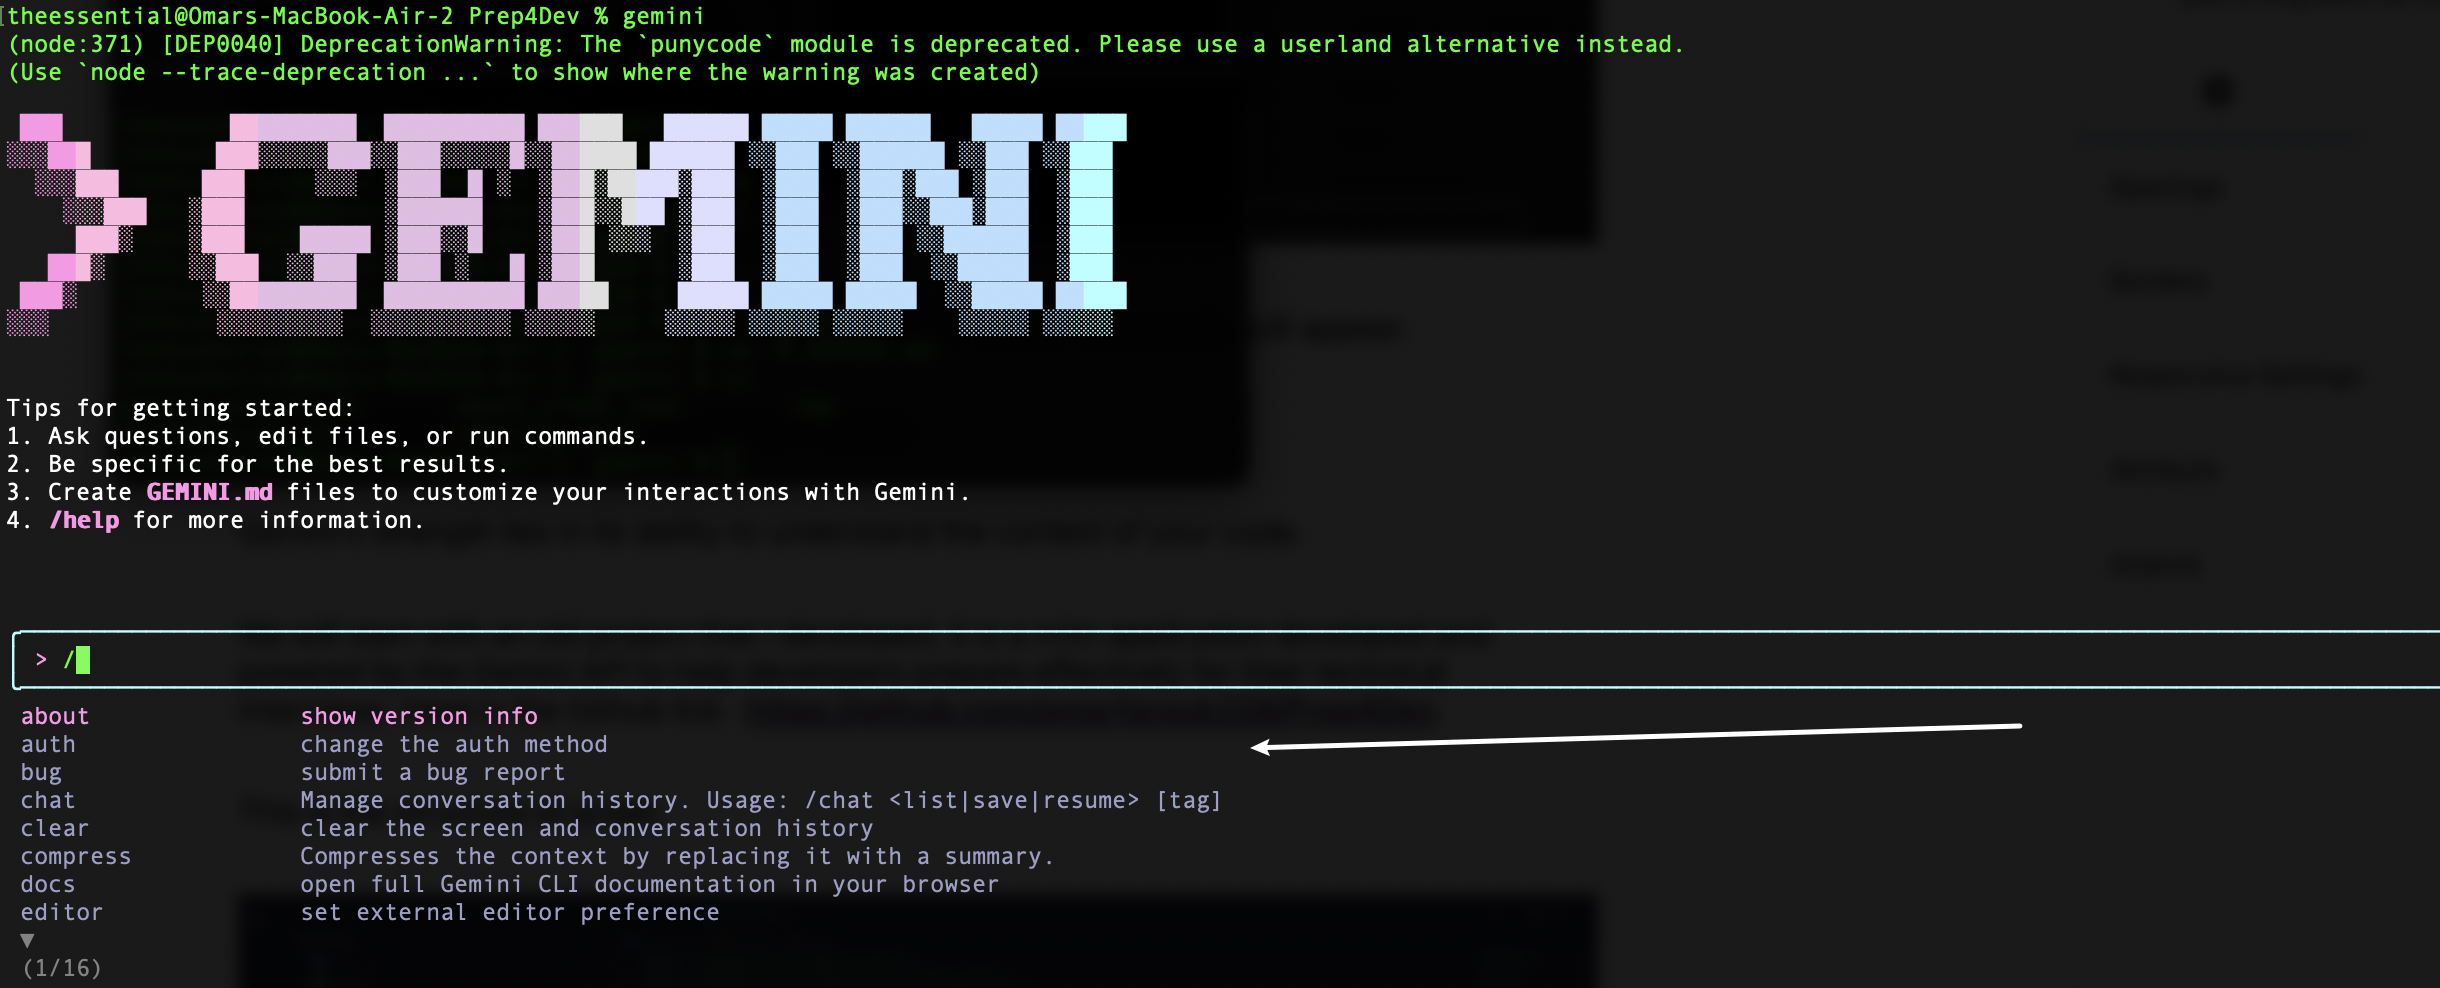
When you tap the “/” in the message zone, a list of helper commands will appear.
First Usecase : Getting to Know Your Project
Gemini’s strength lies in its ability to understand the context of your code.
We will start with an old project that I developed. It is a mini-application developed and powered by the Gemini API to help developers prepare effectively for their technical interviews. Here is the Github link : https://github.com/omarfarouk228/Prep4Dev.
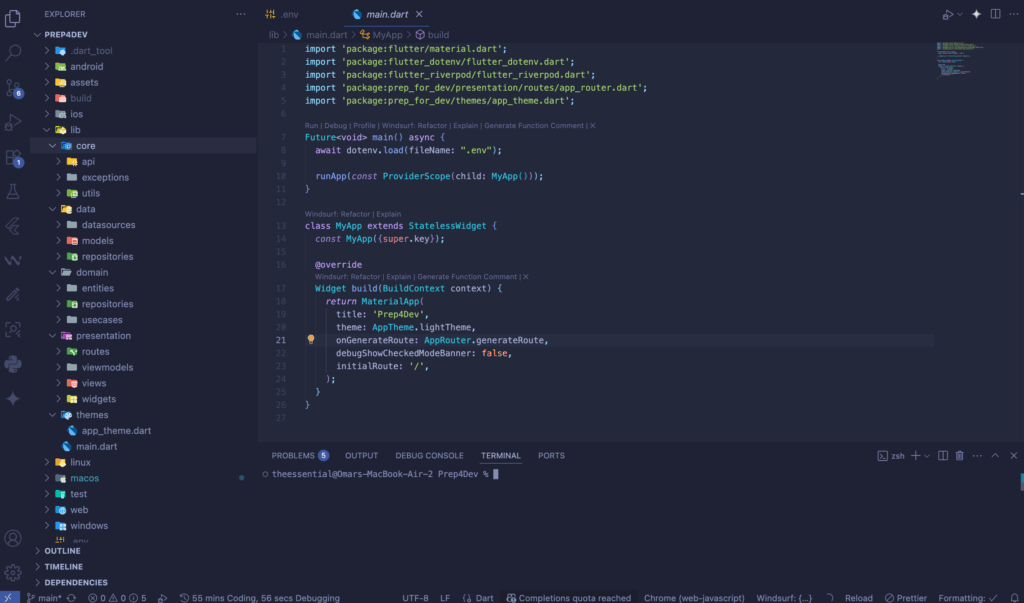
This is the structure of projet:
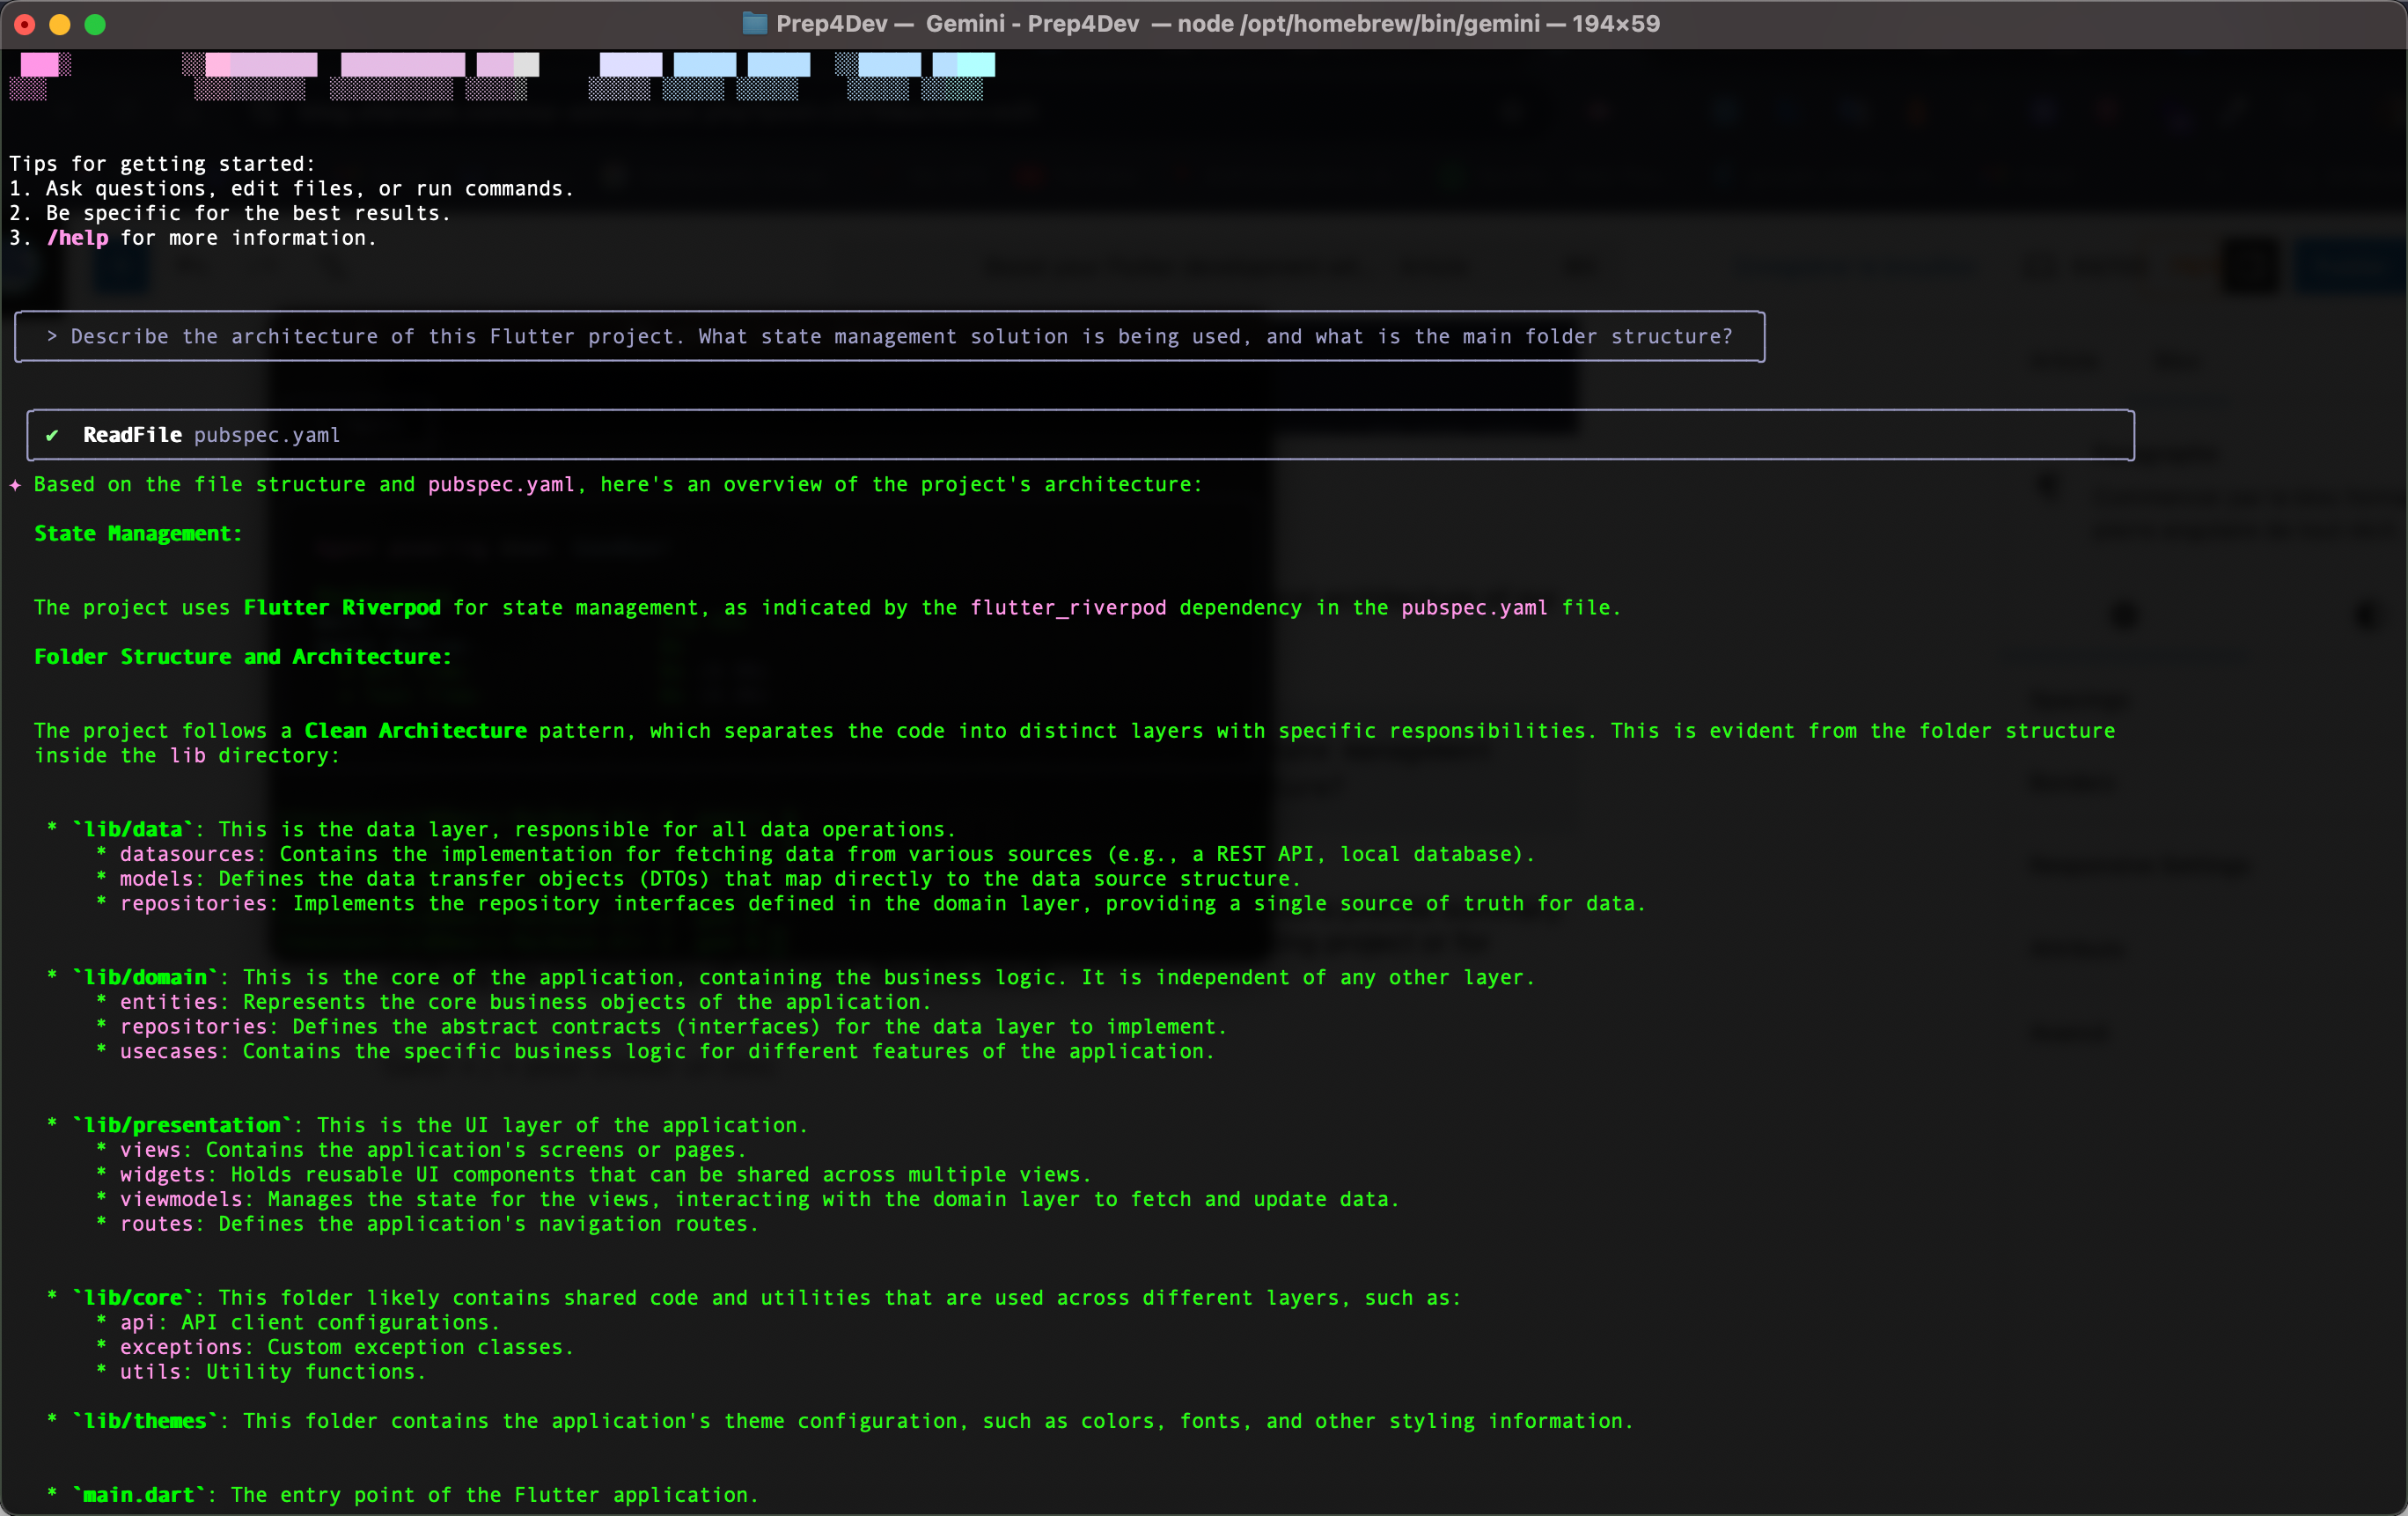
Now, let’s ask gemini to describe the general architecture of our application.
Describe the architecture of this Flutter project. What state management solution is being used, and what is the main folder structure?Gemini will analyze your pubspec.yaml, the structure of lib/, and give you a precise summary. This is an excellent starting point for familiarizing yourself with an existing project or for verifying the consistency of your own. See the result:

⭐️ Customize Gemini for Your Flutter Projects with GEMINI.md
True power is unlocked when Gemini doesn’t just answer, but answers like you would. To ensure perfect consistency across all your Flutter projects, you can create a GEMINI.md file. Gemini will look for this file in the current directory (or parent directories) and apply its instructions to all its responses.
This file acts as a permanent “project charter” for the AI. Create a GEMINI.md file at the root of your project or in your user home directory and fill it with instructions tailored for Flutter. Here is an excellent template to get you started:
# Flutter Project Development Charter

## General Instructions
- When generating new Dart/Flutter code, strictly follow the style conventions defined in "Effective Dart".
- Ensure that all new public functions, classes, and widgets have Docstring comments (`///`).
- Systematically prefer using `const` widgets and constructors whenever possible to optimize build and runtime performance.
- All generated code must be compatible with Dart 3+ and the latest stable version of Flutter. Null safety (`?`, `!`, `required`) must be used strictly and correctly.

## Coding Style and Flutter Conventions
- File names must use `snake_case` (e.g., `recipe_card.dart`).
- Class names, enums, and extensions must use `UpperCamelCase` (e.g., `RecipeCard`).
- Private class members, variables, and functions (visible only within the file) must be prefixed with an underscore `_` (e.g., `_privateVariable`, `_buildHeader()`).
- Avoid using the `as` operator for casting. Prefer type checks with `is` or `try-catch` blocks for better robustness.

## Specific Components and Architecture
- **State Management:** The preferred state management solution for this project is **Riverpod**. When generating providers, always use the new syntax with code generators (`@riverpod`).
- **Folder Structure:** The code is organized by feature (e.g., `lib/features/authentication/`). Each feature contains its own sub-folders (`data`, `domain`, `presentation`). New components should be placed in the corresponding feature folder.
- **Network Layer:** For API calls, use the `dio` package. Always include robust error handling (`try/catch` with custom exceptions) and configure an `Interceptor` for logging requests and responses in debug mode.

## Regarding Dependencies (`pubspec.yaml`)
- Avoid introducing new external dependencies unless absolutely necessary and no alternative exists in the Flutter SDK.
- If a new dependency is required, ensure it has a good score on pub.dev, is well-maintained, and is compatible with other project packages.
With this file in place, every gemini command you run will inherit this context. If you ask it to create a service, it will use dio. If you ask for a provider, it will use the Riverpod syntax. This is a monumental time-saver and a huge boost for consistency.
Part 2: From Idea to UI
One of the most time-consuming tasks is translating an idea or a mockup into UI code. This is where Gemini truly starts to shine.
Brainstorming Features
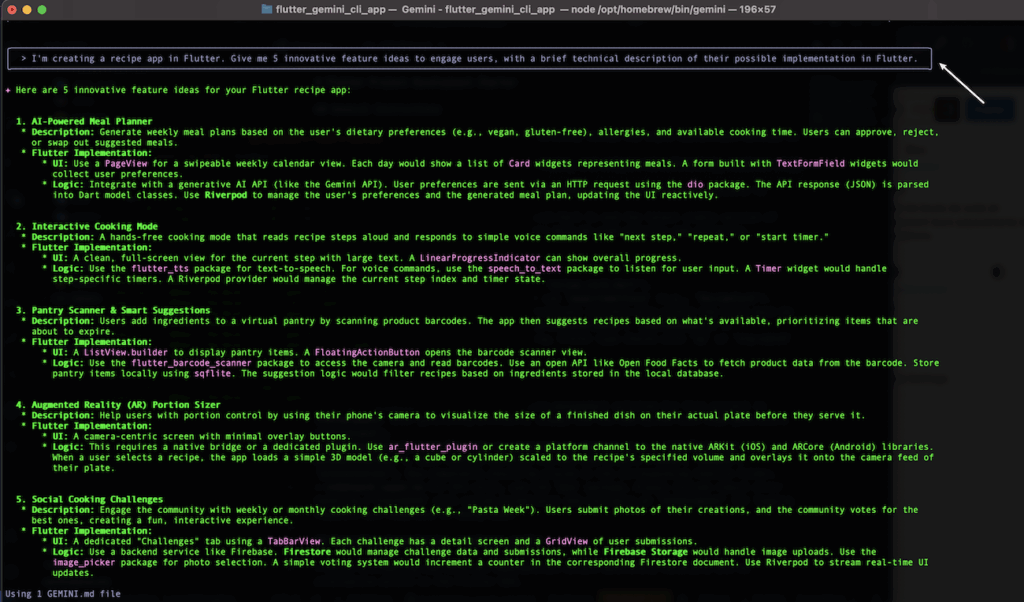
Let’s imagine we’re developing a recipe app. We can use Gemini to explore ideas.
Let’s create a new empty Flutter project and type the gemini command inside it. In the message box, type:
I'm creating a recipe app in Flutter. Give me 5 innovative feature ideas to engage users, with a brief technical description of their possible implementation in Flutter.See the result:
Generating Widgets
Boilerplate is the enemy of productivity. Let’s ask Gemini to write us a custom Card widget to display a recipe preview.
Create a stateless Flutter widget named 'RecipeCard'. It should take the recipe title (String), cooking time in minutes (int), and image URL (String) as parameters. The design should be modern, with an image at the top, a bold title, and the cooking time accompanied by a clock icon. Use the Card widget with slight elevation and rounded corners.
Rewrite also the main.dart's file.
And the magic happens!!!!😁
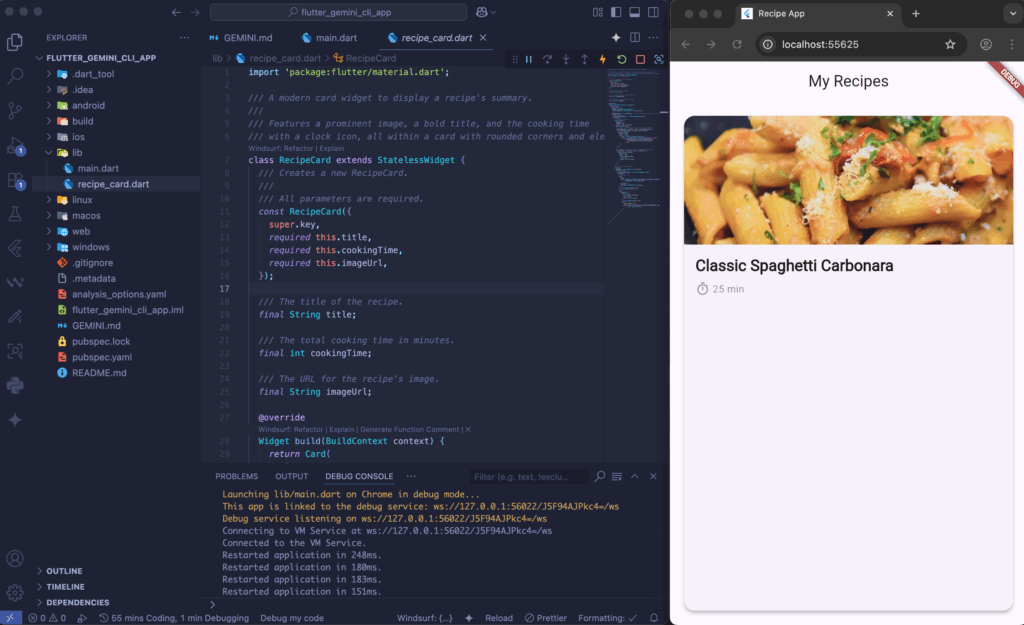
Not only did Gemini create the widget, but it also added useful bonuses like a loadingBuilder and an errorBuilder for the network image.
Part 3: Business Logic and State Management
A beautiful UI isn’t everything. The application logic is the engine.
Interacting with APIs
1 – Create the Data Model: Let’s provide a JSON sample and ask for the corresponding Dart model.
Generate a Dart class 'Recipe' from this JSON. Add 'fromJson' and 'toJson' methods for serialization with the 'json_serializable' package. JSON:
{
  \"id\": 1,
  \"title\": \"Pasta Carbonara\",
  \"duration_minutes\": 25,
  \"image_url\": \"https://example.com/carbonara.jpg\",
  \"ingredients\": [\"pasta\", \"guanciale\", \"eggs\", \"pecorino\"]
}
2 – Generate the API Service: Now, let’s create the network layer with the dio package. (Gemini already knows to use dio from our GEMINI.md file!)
Create a 'RecipeApiService' class in Dart. It should have a method 'Future<List<Recipe>> fetchRecipes()' that makes a GET request to 'https://recipe-api.ofaroukk.com/recipes'. It should handle basic errors and parse the JSON response into a list of 'Recipe' objects.Our API looks like this:

So he will create the model and services folders and put the necessary elements in them.

Implementing State Management with Riverpod
Thanks to our GEMINI.md, asking for a provider is incredibly simple and will follow our chosen best practices.
Using Flutter Riverpod, create a provider that uses 'RecipeApiService' to fetch the list of recipes.In seconds, we have a clean, functional, and perfectly architected structure, ready to be consumed by our UI.
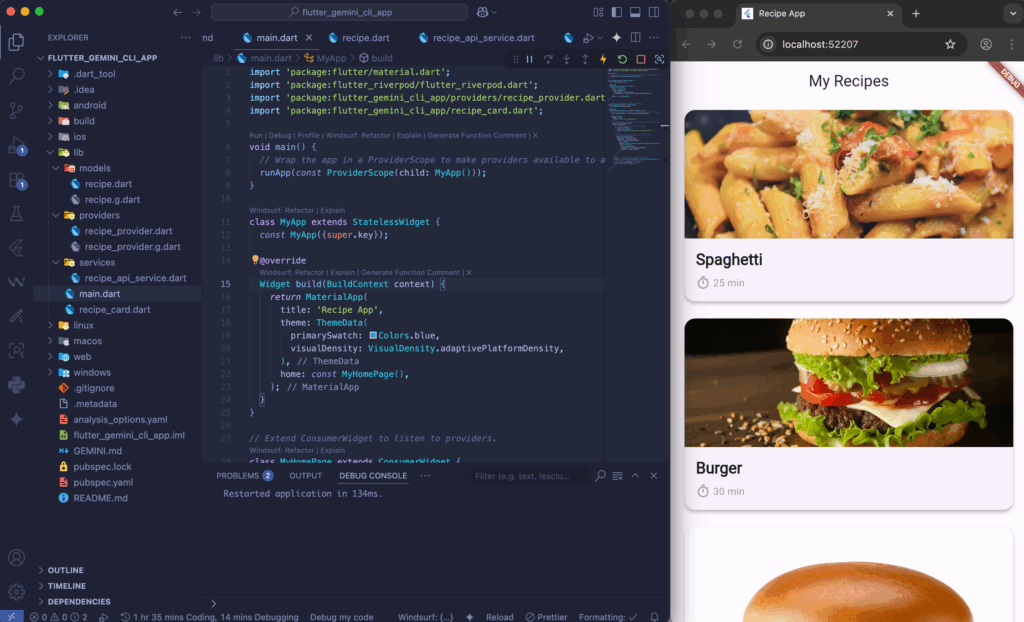
Now we will instruct him to make the changes to display the list of recipes on the home page.
Make the necessary changes in main.dart to display the list of recipes on the home page.After that, your main.dart will look like this with the use of the provider for retrieving recipes.
import 'package:flutter/material.dart';
import 'package:flutter_riverpod/flutter_riverpod.dart';
import 'package:flutter_gemini_cli_app/providers/recipe_provider.dart';
import 'package:flutter_gemini_cli_app/recipe_card.dart';

void main() {
  // Wrap the app in a ProviderScope to make providers available to all widgets.
  runApp(const ProviderScope(child: MyApp()));
}

class MyApp extends StatelessWidget {
  const MyApp({super.key});

  @override
  Widget build(BuildContext context) {
    return MaterialApp(
      title: 'Recipe App',
      theme: ThemeData(
        primarySwatch: Colors.blue,
        visualDensity: VisualDensity.adaptivePlatformDensity,
      ),
      home: const MyHomePage(),
    );
  }
}

// Extend ConsumerWidget to listen to providers.
class MyHomePage extends ConsumerWidget {
  const MyHomePage({super.key});

  @override
  Widget build(BuildContext context, WidgetRef ref) {
    // Watch the recipeListProvider to get the async state of the recipe list.
    final recipeListAsync = ref.watch(recipeListProvider);

    return Scaffold(
      appBar: AppBar(
        title: const Text('My Recipes'),
      ),
      // Handle the different states of the async value (loading, error, data).
      body: recipeListAsync.when(
        data: (recipes) {
          // If there are no recipes, show a message.
          if (recipes.isEmpty) {
            return const Center(
              child: Text('No recipes found. Try again later.'),
            );
          }
          // If data is available, display it in a ListView.
          return ListView.builder(
            itemCount: recipes.length,
            itemBuilder: (context, index) {
              final recipe = recipes[index];
              return Padding(
                padding: const EdgeInsets.symmetric(horizontal: 16.0, vertical: 8.0),
                child: RecipeCard(
                  title: recipe.title,
                  cookingTime: recipe.durationMinutes,
                  imageUrl: recipe.imageUrl,
                ),
              );
            },
          );
        },
        // Show a loading indicator while fetching data.
        loading: () => const Center(child: CircularProgressIndicator()),
        // Show an error message if fetching fails.
        error: (error, stackTrace) => Center(
          child: Text('Error: $error'),
        ),
      ),
    );
  }
}
It’s time to re-execute our project.

Part 4: AI-Assisted Debugging and Optimization
This is where the magic happens. When faced with an error, instead of pasting it into a search engine, we can ask our assistant directly.
Finding the Bug
Imagine you get the infamous Flutter layout error in your console.
I have this error in my Flutter app, can you explain what causes it and how to fix it? Error:
'A RenderFlex overflowed by 9000 pixels on the bottom.
The relevant error-causing widget was:
Column ...'
Gemini, having the context of your code, won’t just give a generic explanation. It might tell you: “This error is likely coming from your recipe_details_screen.dart file. You have a Column that contains a ListView without being wrapped in a widget like Expanded or Flexible.”
Refactoring and Optimization
Your app works, but a widget has become too complex.
Analyze the code for my 'RecipeCard' widget. It's getting too big. Propose a refactoring by extracting at least 3 smaller, more readable sub-widgets. Explain the benefit of each extraction.Gemini will then propose a new structure. For me, _RecipeImage, _RecipeTitle, _RecipeCookingTime.
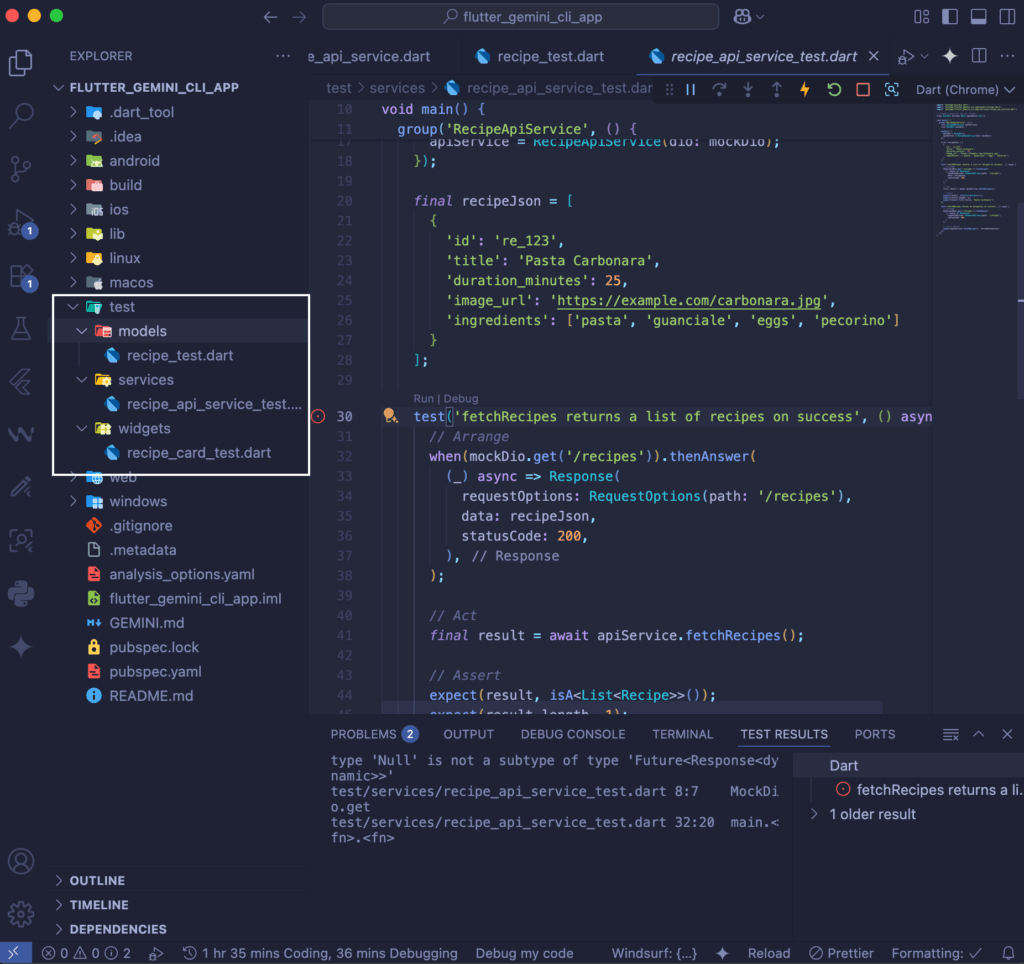
Part 5: Testing and Automation
The final stretch, often neglected: tests.
Generating Unit Tests
Writing tests can be tedious. Delegate it!
Write a comprehensive unit test for my application's features using the “flutter_test” package.Gemini will produce a complete test file, covering the different cases.
Automating Scripts
Need a small script to make your life easier?
Write a shell script (bash) named 'build_and_release.sh'. It should first run 'flutter clean', then 'flutter pub get', and finally run 'flutter build apk --release'. The script should print a message at each step and stop if any command fails.Conclusion: Gemini, Your New Flutter Co-pilot
We have gone through the entire development cycle, and at each step, Gemini has proven to be much more than a simple tool. It’s a brainstorming partner, a tireless code generator, a savvy debugger, and an optimization expert.
Adding a global context file like GEMINI.md transforms this tool into a true member of your team—one that has read and understood your development standards.
Integrating it into your workflow doesn’t replace your expertise as a developer. On the contrary, it enhances it. It handles the repetitive so you can focus on the creative. It manages the tedious so you can tackle the complex.
The future of Flutter development, and development in general, will undoubtedly be conversational. Learning to dialogue and “train” these AI assistants with precise contexts is the new key skill. So, open your terminal, define your charter, and start the conversation. Your next app will thank you for it.
Github link to the recipe app : https://github.com/omarfarouk228/flutter_gemini_cli_app